How to add an author box to WordPress blog? (with or without plugin)
Do you want to add an author bio box on your WordPress blog/post? It is the small section that lets you display the information about the post author along with the links to their website or social media profiles. In this article, we will show how to add an author bio box to your WordPress blog.
Why and When do you need Author Bio Box on your WordPress website?
An author bio box at the end of the blog/post allows your audience to know the actual person behind the content creation. It builds the credibility of your WordPress blog as well as strengthens your site’s authority among users.
For a single-author website, you can add the author bio on the about me page or the contact me page of your WordPress website. However, if your website has multiple authors for writing a blog, you will need to introduce them below each of the posts. For that purpose:- you need to have a readymade author bio box available for each blog/post. To add the readymade author bio to your WordPress blog you use the WordPress author bio plugins that can be found on the web. They come with various types of layouts and customization options for adding a beautiful and elegant author bio box in a few minutes. However, if you have a good knowledge of codes then you can the author bio box by editing your theme files.
Having said that, let’s take a look at how to add an author bio box on your WordPress website with and without using the plugin.
1) Adding Author Bio Box on your WordPress website by coding
If you are about to add the author box on your WordPress blog without using a plugin, we recommend you create and use a child theme to avoid the breakdown of your site if anything doing wrong.
For creating the child theme quickly you can go through the tutorial: How to Create and Install Child Theme on a WordPress website.
- Now after you created the child theme, create a single.php file in your child theme folder. We recommend using a plugin to copy the single.php file from the parent theme folder to the child theme folder.
- Then copy the code given below in the single.php file of your child theme between <div> tag of the post author.
Source Code:
<div>
<h4 class=”about-the-author”>
About The Author
</h4>
<div class=”post author-wrap”>
<itemscope itemprop=”image” alt=”Photo of <?php the_author_meta( ‘display_name’ ); ?>”>
<?php if(function_exists(‘get_avatar’)) { echo get_avatar( get_the_author_meta(’email’), ‘100’ ); } ?>
<h5 class=”vcard author” itemprop=”url” rel=”author”>
<a href=”<?php echo esc_url( get_author_posts_url( get_the_author_meta( ‘ID’ ) ) ); ?>” class=”fn” itemprop=”name”>
< itemprop=”author” itemscope itemtype=”https://schema.org/Person”>
<?php the_author_meta( ‘display_name’ ); ?>
</a>
< class=”author-aka”> a.k.a
< class=”author-aka-name”>
<?php echo get_the_author_meta(‘twitter’); ?>
</h5>
<?php the_author_meta(‘description’) ?>
<class=”post-author-links”>
<?php if (get_the_author_meta(‘facebook’) != ”): ?>
<a class=”author-link f” title=”Follow on Facebook” href=”<?php echo get_the_author_meta(‘facebook’); ?>” target=”_blank”>
<i class=”fa fa-facebook”>
</i>
</a>
<?php endif; ?>
<?php if (get_the_author_meta(‘twitter’) != ”): ?>
<a class=”author-link t” title=”Follow on Twitter” href=”https://twitter.com/<?php echo get_the_author_meta(‘twitter’); ?>” target=”_blank”>
<i class=”fa fa-twitter”>
</i>
</a>
<?php endif; ?>
<?php if (get_the_author_meta(‘google plus’) != ”): ?>
<a class=”author-link g” title=”Follow on Google+” href=”<?php echo get_the_author_meta(‘googleplus’); ?>” target=”_blank”>
<i class=”fa fa-google-plus”>
</i>
</a>
<?php endif; ?>
</div>
- Furthermore, you need to add the following CSS code in the style.css file of your child theme.
Source Code:
/*-Author Box—————————*/
.postauthor-wrap {
float: left;
width: 100%;
clear: both;
padding: 30px;
background: #fff;
box-sizing: border-box;
border-radius: 2px;
-webkit-box-shadow: 0 3px 5px 0 rgba(0,1,1,.1);
-moz-box-shadow: 0 3px 5px 0 rgba(0,1,1,.1);
box-shadow: 0 3px 5px 0 rgba(0,1,1,.1);
}
.postauthor-wrap .fn {
font-size: 24px;
}
.postauthor img {
float: right;
margin-left: 10px;
margin-right: 0px;
margin-bottom: 20px;
border-radius: 50%;
}
.author-aka {
font-size: 16px;
text-transform: lowercase;
font-weight: normal;
color: #5e5e5e;
}
.author-aka-name {
font-size: 17px;
text-transform: lowercase;
font-weight: normal;
color: #111111;
}
.post-author-links {
display: inline-block;
}
a.author-link {
background: #cc0000;
color: #fff;
width: 30px;
text-align: center;
line-height: 1;
height: 30px;
font-size: 12px;
padding: 10px 0;
box-sizing: border-box;
border-radius: 100%;
margin: 0 7px 0 0;
float: left;
}
a.author-link.f {
background: #3b5998;
}
a.author-link.t {
background: #2DA8D2;
}
a.author-link.w {
background: #e64522;
}
- After doing that, a customized author box will be added to your WordPress theme.
- Now, you can configure the author profile. Go to Dashboard > Users > Your Profile to configure the author profile.
- After the configuration is done, check out your customized author box in your WordPress blog/post.
2) Adding the Author Box in WordPress using Plugin
There are many free and premium WordPress plugins for adding an author box to your WordPress website.
For free WordPress author bio box plugins, check the list: 5+ Best Free WordPress Author Box Plugins and for the premium version you can go through the article: Top 3 Author Bio Box WordPress Plugins – Compared.
In this blog, we will use the ultimate author bio box lite plugin for the step-by-step guide for adding the author box on a WordPress website.
Ultimate Author Box Lite: Brief Introduction
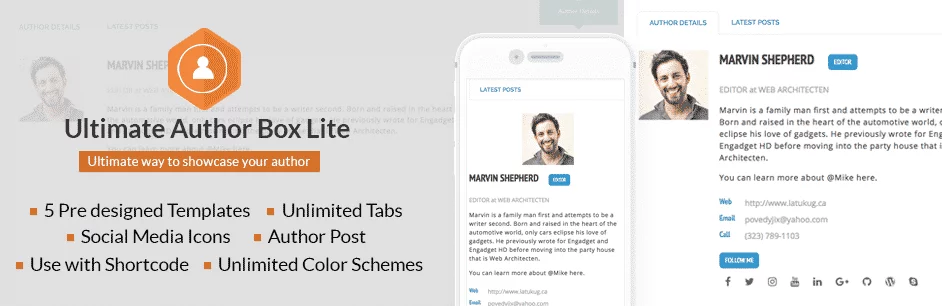
Ultimate Author Box Lite is a free WordPress plugin for adding multiple author information boxes to your WordPress website. It consists of various layouts and advanced features for creating a stunning author bio and displaying them in a matter of a few minutes.
Great Features of Ultimate Author Box Lite plugin:
- 5 Beautifully Designed Templates
- Custom Color Scheme for Templates
- Show/Hide Author Box per Posts
- Support Display images from Facebook, Twitter, Instagram, and custom images
- Unlimited Tabs to your Author Box for Extra Content
- 10 Social Icons for Authors’ Social Profile
- Widget and Shortcodes Ready
Installation and Activation: Ultimate Author Box Lite
Since Ultimate Author Box Lite is a free WordPress plugin you can directly download it and install it from the WordPress.org repository without any cost.
After you install the plugin, activate it and then start working on creating the author bio box.
If you’re new to WordPress and don’t know how to install a plugin in WordPress – check out: How to install a new plugin in WordPress website?
Configuration: Ultimate Author Bio Lite
After you successfully activate and install the plugin, you will see “Ultimate Author Box Lite” on the menu bar. Click on the menu to start the customization of your Author Bio Box.
The customization of Ultimate Author Box Lite consists of 4 tabs. They are:-
General Tab
In the general setting tab, you can choose where you want your author box to be displayed. It can be anywhere: posts, pages, or custom post types. Also, from here, you can define the position of your author box along with the custom message from the author.

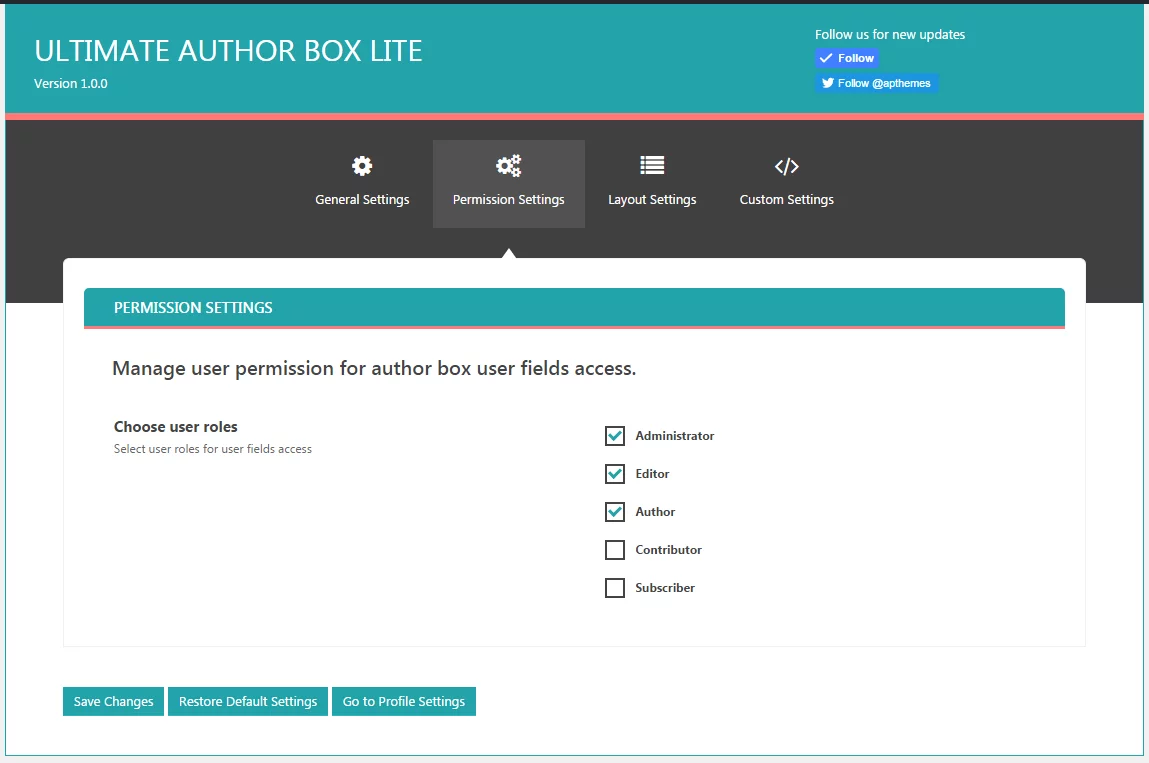
Permission Settings
This page will let you set the role to whom you want your author box to be displayed. You can enable/disable any roles as per your preference to display the author box.
Layout Settings
From the layout settings tab, you set the template for your author box. The plugin comes with 5 pre-designed templates and a custom template option. The custom template option will let you create your custom template by using the custom CSS section.
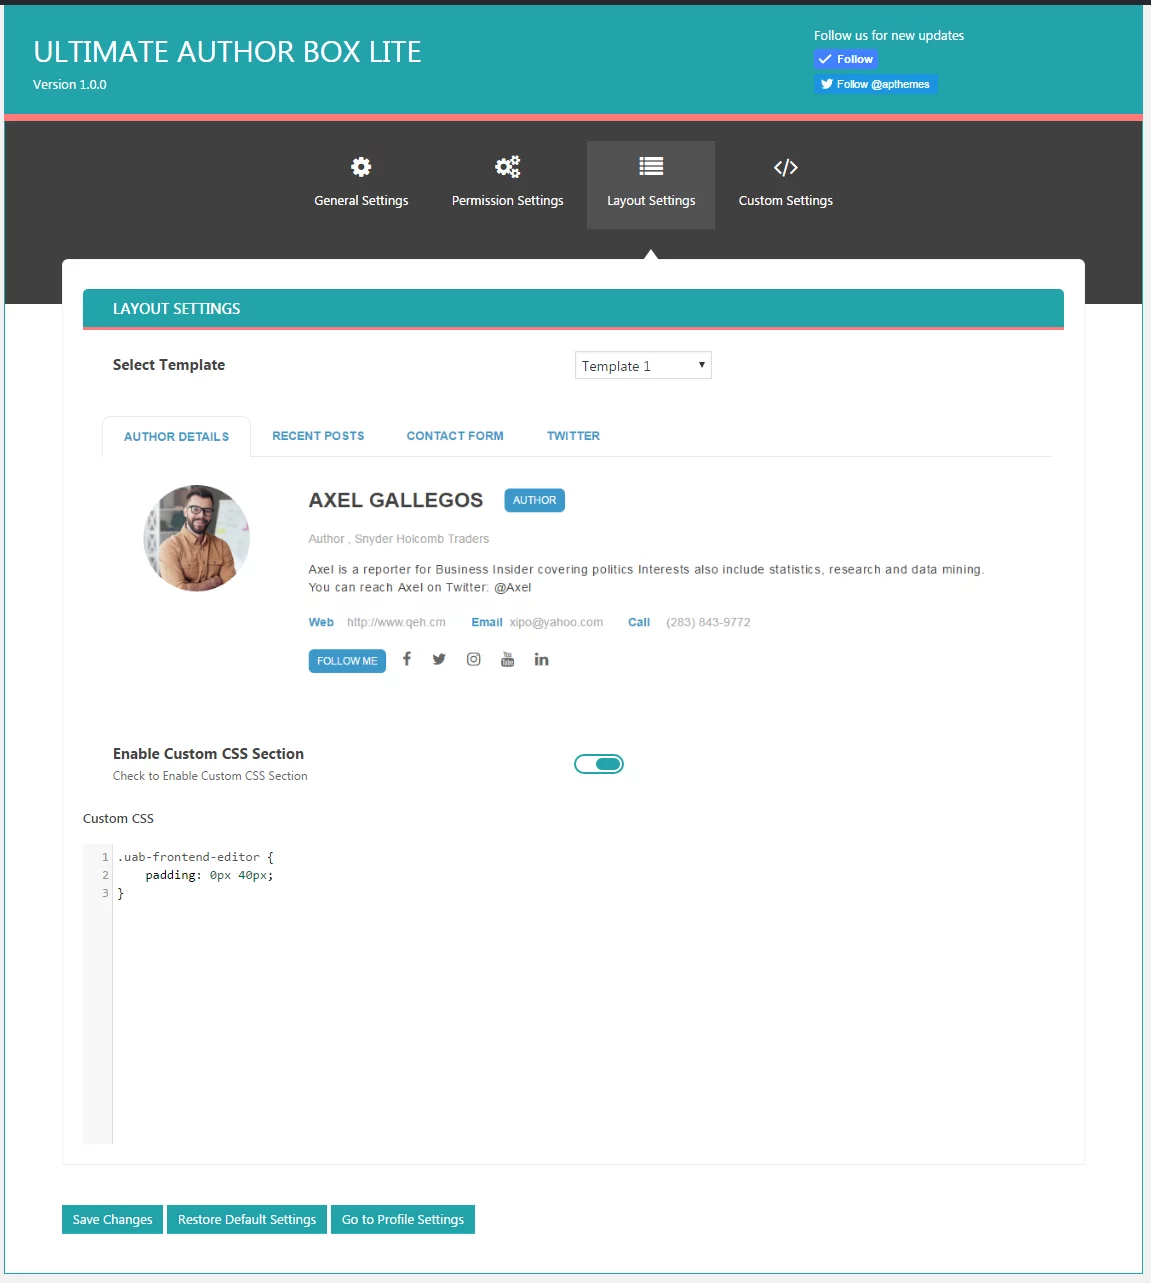
If you want more pre-designed templates for your author box, you can upgrade your plugin to its premium version Ultimate Author Box.
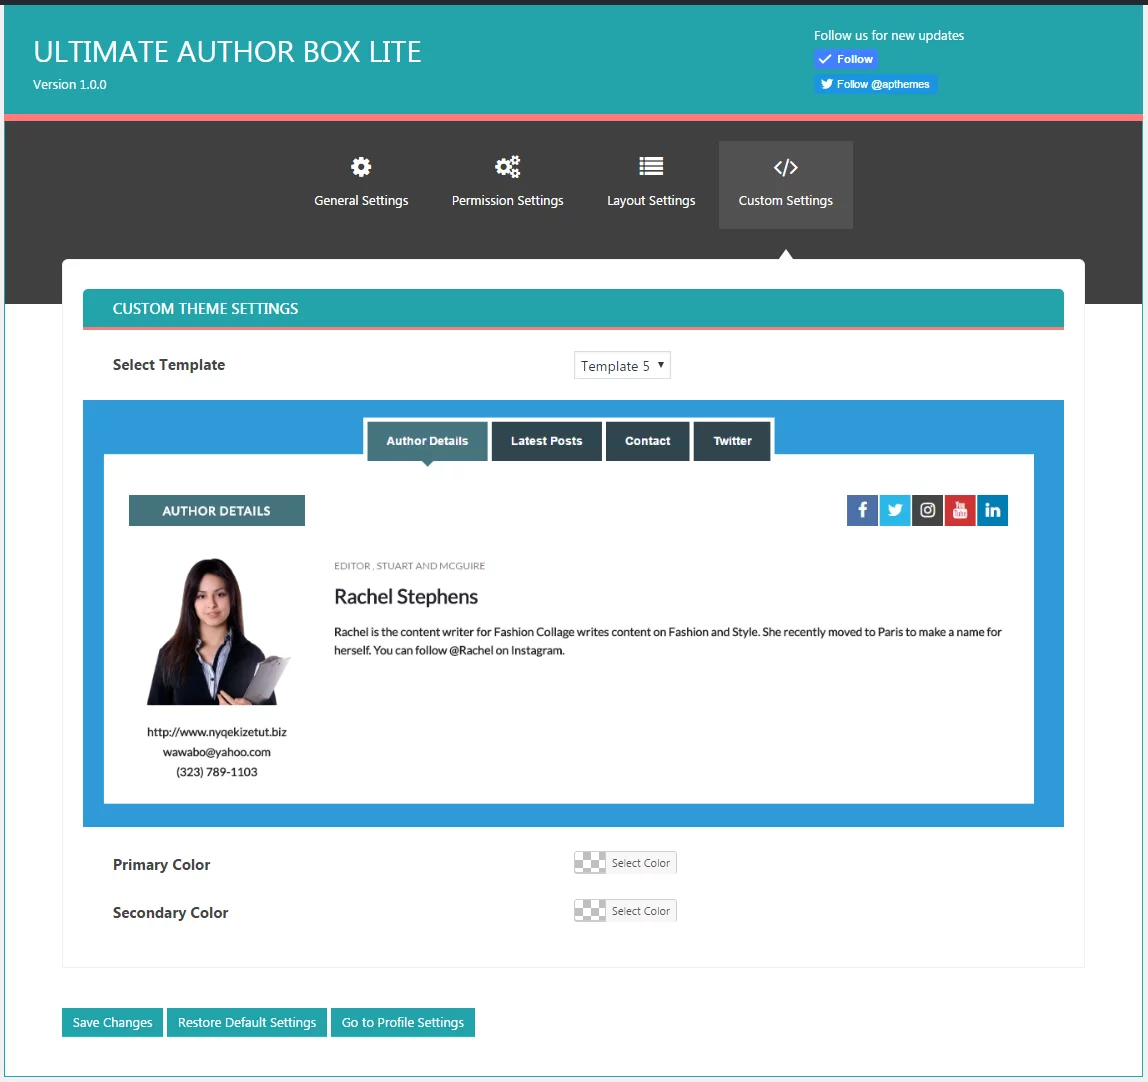
Custom Settings
In the custom settings tab, you can customize the primary and secondary colors of each of the pre-designed templates.
Adding the details of your author before adding the author box
After all the customization is done and saved, you can add the details of the authors that you want to add to the bio box. For that, go to User > All User and choose the author to who you want the detail to be added.
Tips: If you are new to WordPress and don’t know how to add users or authors on your WordPress website or blog. Then you go through the article: How to Add New Users and Authors to your WordPress Blog
After you select the user, you can fill in all the fields (default author settings by WordPress and additional settings “Ultimate Author Box Lite Profile Settings” provided by the plugin).
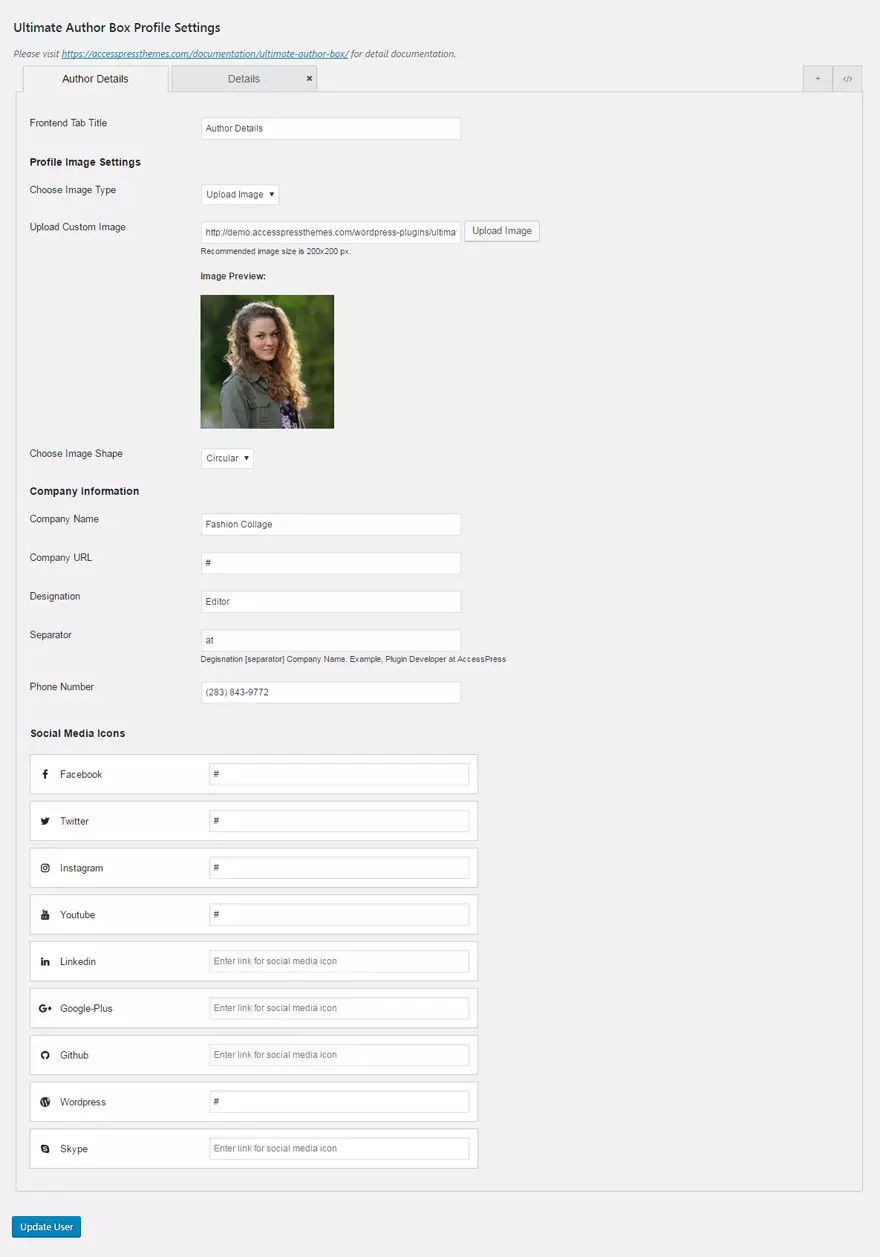
Also, you add different tabs on your bio box using the add tabs options.

When you are done with all the steps mentioned above you can see the following result on your blog post.
Wrapping Up
This is how you can add the author bio box with and without using WordPress plugin. Hope the article has provided you the perfect guideline for adding a beautiful, stunning, eye-catchy and elegant author bio box in few minutes.
Also, check out the other articles related to the author’s bio box
- 5+ Best Free WordPress Author Box Plugins
- 5+ Best WordPress Author Bio Box Plugins 2020 (Updated)
- 7+ Best Author Bio Information Box WordPress Plugins (Free)
- Top 3 Author Bio Box WordPress Plugins – Compared
- Best Free WordPress Plugins to Add Author Info Box in Your WordPress Website.
- WordPress Free Guest Post (Front-end, Anonymous post) Plugin
- WordPress Premium Guest Post (Front-end, Anonymous post) Plugin